
In order to save money, I feel you need to be organized. You need to know what food you have and how much of everything you have. There is nothing worse then forgetting that you had something and finding it after it has expired. As you should know by now, I absolutely HATE throwing food away.
I know I did...until I saw the price tag. These are hundreds of dollars. They are so great because your cans are well organized and they rotate through. I always forget to rotate my cans, so this shelf would be so handy for me. I know though that I will never buy one because they are just too expensive for one, and I have nowhere to put something as huge as that. So if you feel the same way as I do, then this is just the post for you. I am going to teach you all how to make your own can rotators. The best part about it is that it is free, and they fit right in your pantry.
I was hoping to have all of mine finished, painted, and labeled to show you all...but I don't. This last week has been crazy busy. So I will be using pictures from Food Storage Made Easy who also made these. When I get mine all finished, I will show you all pictures, but until then, this will do. On the website Food Storage Made Easy they had a diagram like the one I made, but I disagreed with the measurements on it. Therefore, I made my own diagram for you all!
How to make your own can rotating rack
Step 1
 Print out the "Can Rotator Diagram" which you will find HERE. This is a PDF version of what you see to your left. You may print it, save it to your computer, or do with it what you would like. On this diagram it has a map, measurements, materials needed, and instructions how how to make them. Just choose your can size on the diagram and go from there. I started with the "Vegetable Can" size because that is the size can I have the most of in my pantry.

Step 4
Glue your pieces together. Use the diagram and follow the measurements. Use any fast drying glue to glue the pieces together. If you try using Elmers glue, it will drive you nuts. It takes too long to dry. I tried using a hot glue gun but it was hard to work fast enough before it hardened. When I glued my pieces together, I did it in this order:

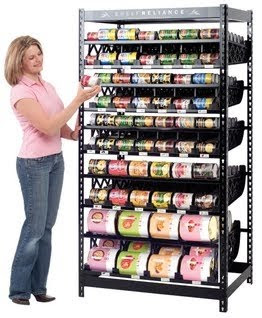
How many of us drool over these shelf reliance shelves?

I know I did...until I saw the price tag. These are hundreds of dollars. They are so great because your cans are well organized and they rotate through. I always forget to rotate my cans, so this shelf would be so handy for me. I know though that I will never buy one because they are just too expensive for one, and I have nowhere to put something as huge as that. So if you feel the same way as I do, then this is just the post for you. I am going to teach you all how to make your own can rotators. The best part about it is that it is free, and they fit right in your pantry.
I was hoping to have all of mine finished, painted, and labeled to show you all...but I don't. This last week has been crazy busy. So I will be using pictures from Food Storage Made Easy who also made these. When I get mine all finished, I will show you all pictures, but until then, this will do. On the website Food Storage Made Easy they had a diagram like the one I made, but I disagreed with the measurements on it. Therefore, I made my own diagram for you all!
How to make your own can rotating rack
Materials needed:
- Cardboard (1 or 2 ply)
- Exacto knife (I bought mine at Home Depot for $3)
- Measuring tool
- Strait edge (I bought a yard stick in the paint section of Home Depot for under $1)
- Fast drying glue
- Paint (optional)
Step 1
 Print out the "Can Rotator Diagram" which you will find HERE. This is a PDF version of what you see to your left. You may print it, save it to your computer, or do with it what you would like. On this diagram it has a map, measurements, materials needed, and instructions how how to make them. Just choose your can size on the diagram and go from there. I started with the "Vegetable Can" size because that is the size can I have the most of in my pantry.
Step 2
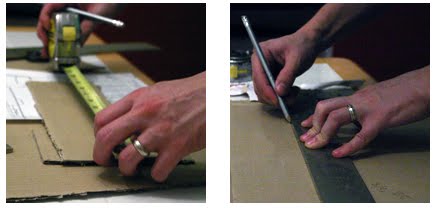
Collect as many free boxes as you can find. Grocery stores and dumpster diving are always the easiest for me. My husband always scores at the dumpsters at our mall. They are always in the best condition too.
After you have collected your boxes, measure out the pieces you are going to need. Use your straight edge to measure and make straight lines.

Step 3
Collect as many free boxes as you can find. Grocery stores and dumpster diving are always the easiest for me. My husband always scores at the dumpsters at our mall. They are always in the best condition too.
After you have collected your boxes, measure out the pieces you are going to need. Use your straight edge to measure and make straight lines.
(Thank you Food Storage Made Easy for the photos)
Step 3
Cut out all of your pieces with an exacto knife. Use your straight edge again with your exacto knife to get perfectly smooth and even lines.

(Thank you Food Storage Made Easy for the photos)
Step 4
Glue your pieces together. Use the diagram and follow the measurements. Use any fast drying glue to glue the pieces together. If you try using Elmers glue, it will drive you nuts. It takes too long to dry. I tried using a hot glue gun but it was hard to work fast enough before it hardened. When I glued my pieces together, I did it in this order:
- One of the side pieces to the back piece
- Bottom shelf to the same pieces
- Middle and top shelf to the same pieces
- Second side to the other side
- Front pieces
After they dry, I recommend reinforcing all of the glued edges with a coating of glue.

(Thank you Food Storage Made Easy for the photos)
Step 6
Paint your rotator racks. Painting them will make them more sturdy and also make them prettier. However, if you do not feel like painting them, then that is just fine.
Step 7
Fill them up with cans and enjoy your beautiful and organized pantry!
Fill them up with cans and enjoy your beautiful and organized pantry!
If you would like to see them in action watch this video. This is not me in the video, it is Jodi from Food Storage Made Easy. Enjoy!


1 comment:
This is a great idea! i would love to do this, but a lot of my food storage is in the bigger #10 cans(like the size of a coffee can). Would this work for that size can as well?
Post a Comment